What to know before you buy your first polytunnel
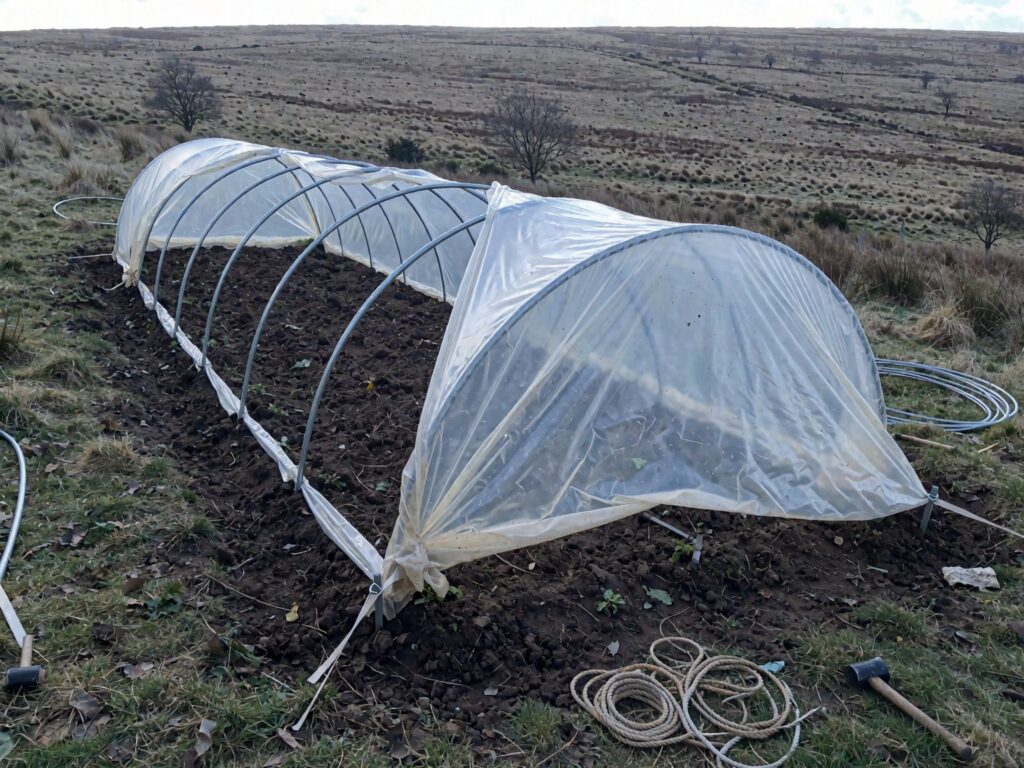
If you are buying your first polytunnel, get three things right before you spend a penny: the size, the site, and how you are going to anchor it against the wind. Everything else, the cover, the doors, what you grow in it, you can change later. Get those three wrong and you will be doing the job twice, which is roughly how I learned it.
Mine went up on the edge of the moor here at High Intake, about 200 metres up, with Whisky supervising from a safe distance and offering nothing in the way of useful advice. The first one I put up was too small, badly sited, and anchored the way the instructions suggested rather than the way the weather up here actually behaves. It lasted one proper gale. The second one has stood for years, so I will tell you what changed.
How big a polytunnel do you actually need
Most people underbuy. A tunnel that looks generous spread out on the catalogue page shrinks fast once you have put a path down the middle and beds either side, and shrinks again once you remember you need headroom to stand up straight among tall crops like beans or tomatoes, not just at the ridge but most of the way along it.
For a first tunnel, I would rather see someone buy slightly too big than slightly too small, within reason. A width of around 2.4 to 3.5 metres suits most domestic plots and still leaves a sensible path with growing space on both sides. Go narrower than that and you end up with one bed and a lot of wasted headroom at the edges where the hoops curve down.
Leave room around the outside too, not just inside. You will want to walk right round it to check guy ropes, clear snow off the sides, and get at the anchors, so do not site it flush against a fence or a hedge with no working space. The RHS is clear on this in its growing-under-cover guidance: allow proper clearance all round, both for access and because foliage pressing against the cover damages it.
Where to put it
Full sun, level ground, good drainage, and shelter from the worst of the wind without heavy shade from trees close by. That is the short version, and it is harder to find on a sloping, exposed plot than you would think.
Avoid a dip or a hollow even if it looks sheltered, because that is exactly where cold air pools on a still, clear night and your tunnel becomes the coldest spot on the plot rather than the warmest. The RHS makes the same point about frost pockets in open ground, and it holds just as well under cover. A gentle slope that lets cold air drain away is better than a bowl that traps it.
Keep it well clear of large trees and hedges, not only for the shade but for the roots, which will compete for water and nutrients right through the tunnel’s growing beds if you site it too close, and for falling branches in a gale, which a polythene cover will not forgive.
On orientation, running the tunnel roughly north to south suits most of the country for even light through the day. Up here, where the winter sun sits low and weak for months, I have had better results running mine closer to east to west, so the broad side catches what low sun there is rather than shading itself. It is worth thinking about for your own plot rather than following a rule blind, because a hedge, a building or a slope can change the answer.
Anchoring it against the wind
This is the one that caught me out, and it is the one that matters most up here. A standard anchor kit, the sort sold with most domestic tunnels, is built for an average garden. It is not built for a plot on the moor edge with nothing much between you and the weather coming off the tops.
The base rails want burying properly, not just pegged on the surface, and the ground anchors want driving in at an angle rather than straight down, so they resist being pulled upward as well as sideways. Where the standard spacing is generous, I would go tighter, especially on the end hoops, which take the brunt of a gusting wind trying to lift the whole structure like a sail.
If your plot has no natural shelter, a hedge or a fence on the prevailing wind side helps enormously, as long as it is not so solid it blocks light or creates its own turbulence on the lee side. Garden Organic’s advice on exposed sites is the same whether you are growing under cover or in the open: a permeable windbreak, something that filters the wind rather than stopping it dead, does more good than a solid wall.
Do the anchoring properly before your first winter, not after. The first proper gale does not wait for you to get round to it.
The cover, and whether you need planning permission
Covers are usually sold rated for a certain life under UV, with better-rated covers lasting longer and costing more, and earning their keep on an exposed site where the wind flexes the sheet constantly and ages it faster than it would on a sheltered lowland plot. If you are choosing between two covers and your plot is windy, pay for the longer-rated one.
On planning permission, the honest answer is that most ordinary garden polytunnels for a domestic plot do not need it, because they are generally treated as temporary structures rather than buildings. But do not take that as settled before you buy, because the exceptions matter. If you are in a National Park or an Area of Outstanding Natural Beauty, as I am here on the moor edge, the rules around garden structures can be tighter than they would be in an ordinary residential garden. The same goes if your plot is large enough that the tunnel starts to look like an agricultural structure rather than a domestic one, if it sits close to a boundary or a road, or if your property is listed. A quick call or email to your local planning authority before you buy costs nothing and saves an argument later.
Last frost matters for when you start using the tunnel in earnest, not for putting it up, but it is worth knowing while you plan. Up here on the moor edge, at around 200 metres, the last frost checked against Met Office data typically holds on later into spring than most people expect. Down on lower ground, some 150 to 200 metres below us, you can usually count on it clearing about two weeks earlier, and roughly a week later again for every 100 metres higher than here. Get your tunnel up and anchored well before then, so it has already proved itself against a bit of weather before you are relying on it for anything.
Get the size right, the site right, and the anchors right, and the rest of it looks after itself. That is the whole of what I wish someone had told me before my first one went up.
